Showing posts with label discarded wood. Show all posts

2013/07/31

Quickie Work Bench : A table from six scraps

Last year I pulled these six scrap boards from of a dumpster behind an old Ingles. They're pretty badly cupped but otherwise solid, hard yellow pine 2x12s.
A sharp, functional work bench is quickly constructed from rescued hard yellow pine boards. (easy DIY work table) 
It's amazing what people get rid of during a tear-out.

I squared up the boards and made some rips.
A sharp, functional work bench is quickly constructed from rescued hard yellow pine boards. (easy DIY work table)
All of the wood for this project is stacked on the left. The only scraps are on the right.

You may have noticed that for way too long I have worked without a bench. Cuts were made out on the deck and most pieces were assembled on the floor.
A sharp, functional work bench is quickly constructed from rescued hard yellow pine boards. (easy DIY work table)
So this is long overdue. 
A sharp, functional work bench is quickly constructed from rescued hard yellow pine boards. (easy DIY work table)
 It's a simple design from scrap lumber and it went together quickly. If every project could be like this...

A sharp, functional work bench is quickly constructed from rescued hard yellow pine boards. (easy DIY work table)
 I won't be making any more cuts out here.

This helper really digs it.
A sharp, functional work bench is quickly constructed from rescued hard yellow pine boards. (easy DIY work table)
 He also helped me install additional bracing from the leftover cutoffs.
A sharp, functional work bench is quickly constructed from rescued hard yellow pine boards. (easy DIY work table)
Little known fact about furniture biology: tables asexually reproduce more tables. It's a fascinating life cycle.
] j [

2013/06/28

Mystery hardwood revealed: it's an end table!


small end-grain tile cross cut from an aged hardwood timber, possibly Black Walnut
Don't be confused; it's not the world's smallest end table. It is the most engaging of the 96 little tiles I sliced from an old timber.

aged hardwood timber, possibly Black Walnut
I kept that timber for a reason, but for a long time it was unremarkable, waiting for the right moment to speak to me.
cross cut from an aged hardwood timber, possibly Black Walnut
While organizing the workshop, I saw some mold on one end and went outside to cut it away. That's when the timber spake, "Behold, my intoxicating fresh end grain and sawdust like a terra cotta murder scene."
cross cut from an aged hardwood timber, possibly Black Walnut
 I decided to slice it into tiles. Wanting to preserve the distinct rough-sawn marks on either side, I ripped them off first.
cross cut from an aged hardwood timber, possibly Black Walnut
I liked the little slats, so I sliced the timber into three sections to cut two more at the same width.
cross cut from an aged hardwood timber, possibly Black Walnut
  Any subtle change in the light or the surface reflects in the coloration and natural luster.
slats ripped from an aged hardwood timber, possibly Black Walnut

small end-grain tiles cross cut from an aged hardwood timber, possibly Black Walnut
(first layout attempt)
small end-grain tiles cross cut from an aged hardwood timber, possibly Black Walnut
 (from Reboot)
small end-grain tiles cross cut from an aged hardwood timber, possibly Black Walnut
large aged end-grain flooring cut from hardwood timbers, possibly Black Walnut
 This end-grain wood floor was the original inspiration.

 I'll be going with the layout below:
small end-grain tiles cross cut from an aged hardwood timber, possibly Black Walnut
(six tiles shy)


small end-grain tiles and rough-sawn slats cross cut from an aged hardwood timber, possibly Black Walnut
I can now see an end table coming together. The tiles will be wrapped in rails, those four slats ripped from the same timber. From the house where I found the timber I also salvaged some old tongue and groove flooring painted a pale aqua and various weathered boards. The T&G will serve as a base for the tiles and from one weathered board I'll create legs.

small end-grain tiles cross cut from an aged hardwood timber, possibly Black Walnut, formed into cute little bookmatched coasters, bookmatched walnut
With excess irregular tiles, I can also form bookmatched coasters.

It really doesn't smell like Cedar. It's rich and earthy and behaves more like Walnut, besides the purplish cast and clay colored sawdust. The man who built and lived in that house milled the wood from his own land; I can't imagine it's not indigenous. Despite looking different in every photo, the tone is consistent throughout so it can't be stained. I'm still not sure what kind of wood it is, but I am sure I love it!

2013/06/17

Hutching a Plot: Clover's Rabbit Hutch Pt. II

Clover the cuddlebunny has a contract with CARPEntryDIEM.blogspot.com
In case you are wondering, yes I have a contract with Clover.

We left off with an array of boards reclaimed from Sierra Nevada.
magic number 16 displayed on two critical future siding boards

From the first stack of wood I salvaged from smaller pallets, I set to making structural members. Using the rip fence on my trusty little circular saw, the heavy duty supports were ripped in half.ripping down heavy-dut pallet supports to salvage for use in a rabbit hutch
This yielded twelve sticks at 42" to use for framing.
drips are caught on an unfinished painting from an AAAC painting party
As I went, selecting boards to fill in a complete sketch and ripping where required, the wood was painted to finish prep.I chose a dark purple from the return section of a local mega-chain hardware store. I usually try to snag my paint from these racks at a big discount.
boards salvaged from Sierra Nevada pallet lumber are stacked after painting
 The idea is to provide a complete base coat on all surfaces of the untreated lumber, even unexposed end-grain cuts when possible. The final coat will come from only half a quart of a brilliant red, which should create a streaky, rustic finish as it fights to cover the darker purple.first step toward framing, front and back frames are painted on end grain and countersink holes
Basic framing is completed before transporting material to the site. I painted hidden end grains and countersink holes on the front and back walls of the covered portion of the hutch.

covered portion of the rabbit hutch is framed out rough
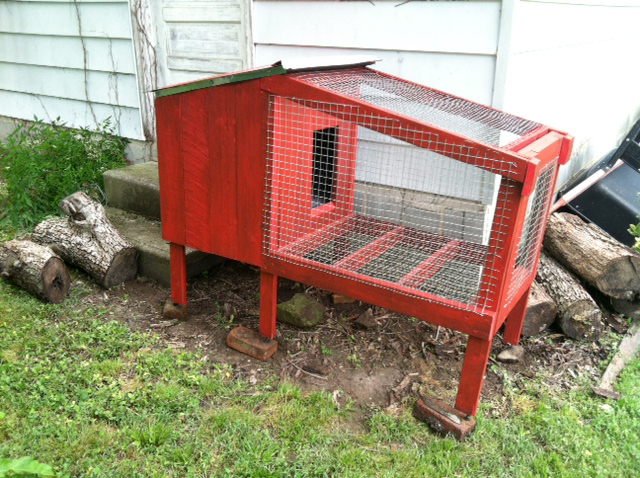
 Here is the rough framing for the covered section of the hutch.
four walls of the covered portion of the rabbit hutch with siding complete
 Now with siding complete, it begins to feel like home.
framing for the open portion of the rabbit hutch is begun, front door is tested
 The open section is connected and the front door is tested.
rabbit hutch is complete, front / side view
the rabbit hutch is complete, rear door view
The front and back door function with simple block latches.
completed rabbit hutch, front / sode view showing open door / bunny ramp / hutch hatch
The metal roof was cut from a piece of scrap. Most of the fasteners were leftovers or salvage from previous projects. Rubber washer screws, elevator bolts, mesh and fence staples were purchased new.
completed rabbit hutch, rear door open
A big thank you goes out to Don Schjeldahl of Sierra Nevada for the opportunity. And also to the Rimer family for trusting me to build this fun and fulfilling little farm house. If anyone has a truck and an idea, I would love to gather more wood from Mills River and build another dream . . .

2013/06/14

Adventures in Sierra Nevada Land: Clover's Rabbit Hutch Part I

Clover the Bunny is exremely fluffy and cute
In my ReBoot, I offered a dedicated post to Clover's rabbit hutch. I have so many fun images that I've split it into two parts. The story begins in Mills River, North Carolina where Sierra Nevada Brewing Company is busy constructing the largest 'craft brewery' I could ever imagine.

Through Kitty Love of the Asheville Area Arts Council, I learned of a call to local artisans: to collect and make good use of abundant crates and pallets before they should be turned to mulch!
pallets built with a 17-foot diameter arc to transport stainless steel fermentation tanks
These pallets are built with a 17-foot diameter arc to transport 60-foot tall stainless steel fermentation tanks from Germany! You can see some of the tanks towering in the background.
(no shortage of plywood scraps)
It just goes on and on. These images don't even show everything. Don, the Site Manager, took me around from pile to pile so I could see what was available. Along the way he educated me on Sierra Nevada's green building initiatives. However, I wasn't permitted to take images of the actual building sites.
endless array of pallet wood available at Sierra Nevada's new Mills River brewery.
We joked that the stack pictured below is only lacking a few posts and drying in and you have an instant cabin with a deck!
solid timbers and straight clear boards were used to construct these German engineered crates
 Unfortunately, two standard sized pallets was all that I could fit into the Love Machine that day.
Asheville Love Machine can hold only two standard pallets

Back home, I set to the task of deconstructing my scrawny pallets. The larger one contained some decent boards and lumber. Virtually all of the wood available was heat-treated and so dimensionally stable and (relatively) free of insects.
pallets made of heat treated lumber
 (below you can see the 'HT' stamp)
juju jar sits on top of my deconstructed pallets
(the Juju jar is quickly filled with scrap nails)

The next day, I lured Justin into the fray. He came for a short visit with Charlie.
huge spikes fastened the pine cross timbers to the load-carrying members
 Yup, almost Nine-Inch-Nails.
We grabbed three long pallets similar to the one below. The largest was a couple feet longer than this one.
long pallet of sturdy German construction, heat treated lumber
Cutting the boards loose proved to be the quickest way of disassembly. Someone in Germany went overboard with the ring-shank nails . . .
eiht ring-shank nails on ach board was too much for my little nail puller
 We agreed that for the use of his truck, Justin should take the choice material: straight clean pine timbers.
pine timbers and cross timbers cut free of pallet boards

We had two other helpers along that day and they were thrilled to tour the Brewery site. After all, they were required to wear hard hats. This one is destined to have his tongue carried away by birds:
sturdy little helper stands up a timber over twice his size
 They did a wonderful job of neatly stacking the boards upstairs in my workshop.
little helpers have expert stacking skills
Just kidding; I had to do that part. But they did happily bring it all upstairs while Justin and I were busy cutting and whacking away.

The next day, I graded and stacked the wood; now I am ready to get to it!

synchronicity in grading wood: sixteen boards were exactly what I needed for the task at hand
How's this for synchronicity? Sixteen prime boards (relatively uncupped, unbowed, unchecked & untwisted) and the number sixteen randomly appears twice. In the end I needed exactly these sixteen boards for siding on Clover's rabbit hutch . . .
apple-shaped wood grain surrounds a knot hold next to the Juju jar
I might make a cutting board from the top piece there. I wonder, would that knothole be annoying or useful?